TO USE THE ALIGNMENT FIXTURE AND THE SUBSTRATE LIFTER::
1. Place the substrate onto the alignment fixture plate using the appropriate step on the plate.
2. Use the handle to move the plate over the chuck until the stop screw stops the motion. The stop screw has been factory set so that it aligns the substrate with the centerline of the motor shaft.
3. Press the "Up" button to cause the lifter platform to raise the substrate off the plate.
4. Use the handle to move the plate out of the way of the spinner lid path.
5. Apply vacuum to the chuck. This will automatically lower the substrate to the chuck.
PROCEDURE FOR DEFINING THE STOP POINT FOR THE SUBSTRATE ALIGNMENT PLATE:
The alignment fixture on this machine has been factory set such that the alignment disc is centered with respect to the centerline of the motor shaft when moved against the stop. However, after repeated use, the stop screw may need to be reset in order to properly align the substrate on the chuck. In order to facilitate this, an alignment stop tool kit is included that will make this an easy process.

In order to properly use the tool kit to align the substrate alignment plate, do the following:
1. Move the alignment fixture plate away from the bowl and make sure there is no substrate on the chuck.
2. Remove the lift rod and chuck. Do this by first pressing the "Up" button to lift the rod out of the motor and then gently lifting it out of the motor shaft. Then lift the chuck off of the motor shaft. Leave the button in the "Auto" position in order to keep vacuum out of the system while you are aligning the substrate alignment disc.
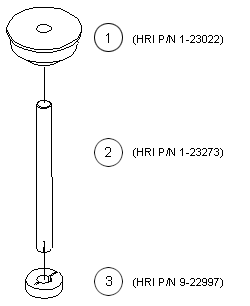
3. Push the alignment rod (item 2 in Figure 2) over the motor shaft. DO NOT REMOVE THE MOTOR SHAFT PROTECTOR!!
4. Slip the collar (item 3 in Figure 2) over the rod and tighten it onto the shaft.
5. Move the alignment plate over the bowl and slip the slide (item 1 in Figure 2) over the rod such that it falls into the center hole of the alignment plate.
6. Adjust the alignment stop screw as needed and then lock it into place.
7. Remove the slide and move the alignment plate out of the way.
8. Remove the collar and rod from the motor shaft.
9. Reassemble the chuck and lift rod to the motor shaft